No edit summary |
|||
| (3 intermediate revisions by 2 users not shown) | |||
| Line 1: | Line 1: | ||
{{Structure infobox | {{Structure infobox | ||
|image = | |image = Standard_Lockah.png | ||
|image_size = | |image_size = 350 | ||
|spawn = | |spawn = [[Light Containment Zone]]<br>[[Heavy Containment Zone]]<br>[[Entrance Zone]] | ||
}} | }} | ||
The '''Standard Locker''' is a type of [[Site-02|Structure]] found in ''SCP: Secret Laboratory''. | |||
=In Game= | =In Game= | ||
Standard Lockers are lockers that contain random loot and will randomly spawn in certain rooms around Site-02. Standard Lockers can be opened and closed by players by pressing the {{Key Press|E}} key. The items inside of a Standard Locker are random each round. <br> | |||
There are six spawn points inside the Standard Locker where items can spawn. A minimum of two will always have loot, with a maximum of five being filled. | |||
At least three Standard Lockers can spawn in a game, with a 50% for a fourth one to spawn. | |||
==Possible Spawn Locations== | ==Possible Spawn Locations== | ||
<u> [[Light Containment Zone]] </u> | |||
* | * One can spawn in the side room of the [[Light Containment Zone#Garden Chamber - VT|Garden Chamber]]. | ||
* | * One can spawn to the left of the door in [[Light Containment Zone#Office - PC15|PC15]], against the wall. | ||
* | * One can spawn on the right wall of the [[Light Containment Zone#Glass Room - GR 18|Glass Room]], across from the glass and door. | ||
* | * One can spawn to the right of the door, outside of [[Light Containment Zone#Test Chamber 1 - TC01|Test Chamber 1]]. | ||
* | * One can spawn right next to the door to [[Light Containment Zone#SCP-173's Containment Chamber - PT00|173's Containment Chamber]]. | ||
*Entrance Zone | <u> [[Heavy Containment Zone]] </u> | ||
* | * One can spawn in the main lab of [[Heavy Containment Zone#SCP-939's Containment Area|SCP-939's Containment Area]], next to the door for Cryo Storage. | ||
* | |||
<u> [[Entrance Zone]] </u> | |||
* Up to two can spawn in the [[Entrance Zone#Two-Story Office|Two-Story Office]], opposite to the base of the stairs or by the top of the stairs. | |||
* One can spawn within the cubical in the [[Entrance Zone#Large Office|Large Office]]. | |||
'''Possible Loot:'''<br> | '''Possible Loot:'''<br> | ||
| Line 25: | Line 33: | ||
!style="text-align:center;padding: 5px;background-color:#333333;"|Chance | !style="text-align:center;padding: 5px;background-color:#333333;"|Chance | ||
|- | |- | ||
|colspan="2" style="border-style: solid; border-width: 1px 0 1px 1px;border-right:solid 2px white;padding: 5px;background-color:#111111;"|{{ | |colspan="2" style="border-style: solid; border-width: 1px 0 1px 1px;border-right:solid 2px white;padding: 5px;background-color:#111111;"|{{ItemTable2|Scientist Keycard}} | ||
|style="padding: 5px;text-align:center;background-color:#111111;"|2 | |style="padding: 5px;text-align:center;background-color:#111111;"|2 | ||
|style="padding: 5px;text-align:center;background-color:#111111;"| | |style="padding: 5px;text-align:center;background-color:#111111;"|{{WeightedProbability|weight=2|totalWeight=16}} | ||
|- | |- | ||
|colspan="2" style="border-style: solid; border-width: 1px 0 1px 1px;border-right:solid 2px white;padding: 5px;background-color:#111111;"|{{ | |colspan="2" style="border-style: solid; border-width: 1px 0 1px 1px;border-right:solid 2px white;padding: 5px;background-color:#111111;"|{{ItemTable2|Zone Manager Keycard}} | ||
|style="padding: 5px;text-align:center;background-color:#111111;"|2 | |style="padding: 5px;text-align:center;background-color:#111111;"|2 | ||
|style="padding: 5px;text-align:center;background-color:#111111;"| | |style="padding: 5px;text-align:center;background-color:#111111;"|{{WeightedProbability|weight=2|totalWeight=16}} | ||
|- | |||
|colspan="2" style="border-style: solid; border-width: 1px 0 1px 1px;border-right:solid 2px white;padding: 5px;background-color:#111111;"|{{ItemTable2|First Aid Kit}} | |||
|style="padding: 5px;text-align:center;background-color:#111111;"|1 | |||
|style="padding: 5px;text-align:center;background-color:#111111;"|{{WeightedProbability|weight=1|totalWeight=16}} | |||
|- | |- | ||
|colspan="2" style="border-style: solid; border-width: 1px 0 1px 1px;border-right:solid 2px white;padding: 5px;background-color:#111111;"|{{ | |colspan="2" style="border-style: solid; border-width: 1px 0 1px 1px;border-right:solid 2px white;padding: 5px;background-color:#111111;"|{{ItemTable2|Flashlight}} | ||
|style="padding: 5px;text-align:center;background-color:#111111;"|2 | |style="padding: 5px;text-align:center;background-color:#111111;"|2 | ||
|style="padding: 5px;text-align:center;background-color:#111111;"| | |style="padding: 5px;text-align:center;background-color:#111111;"|{{WeightedProbability|weight=1|totalWeight=16}} | ||
|- | |- | ||
|colspan="2" style="border-style: solid; border-width: 1px 0 1px 1px;border-right:solid 2px white;padding: 5px;background-color:#111111;"|{{ | |colspan="2" style="border-style: solid; border-width: 1px 0 1px 1px;border-right:solid 2px white;padding: 5px;background-color:#111111;"|{{ItemTable2|Janitor Keycard}} | ||
|style="padding: 5px;text-align:center;background-color:#111111;"|1 | |style="padding: 5px;text-align:center;background-color:#111111;"|1 | ||
|style="padding: 5px;text-align:center;background-color:#111111;"| | |style="padding: 5px;text-align:center;background-color:#111111;"|{{WeightedProbability|weight=1|totalWeight=16}} | ||
|- | |- | ||
|colspan="2" style="border-style: solid; border-width: 1px 0 1px 1px;border-right:solid 2px white;padding: 5px;background-color:#111111;"|{{ | |colspan="2" style="border-style: solid; border-width: 1px 0 1px 1px;border-right:solid 2px white;padding: 5px;background-color:#111111; white-space: nowrap;"|<p>{{ItemTable2|Painkillers}}(x3)</p> | ||
|style="padding: 5px;text-align:center;background-color:#111111;"|2 | |style="padding: 5px;text-align:center;background-color:#111111;"|2 | ||
|style="padding: 5px;text-align:center;background-color:#111111;"| | |style="padding: 5px;text-align:center;background-color:#111111;"|{{WeightedProbability|weight=1|totalWeight=16}} | ||
|- | |- | ||
|colspan="2" style="border-style: solid; border-width: 1px 0 1px 1px;border-right:solid 2px white;padding: 5px;background-color:#111111;"|{{ | |colspan="2" style="border-style: solid; border-width: 1px 0 1px 1px;border-right:solid 2px white;padding: 5px;background-color:#111111;"|<p>{{ItemTable2|Coin}}(x4)</p> | ||
|style="padding: 5px;text-align:center;background-color:#111111;"|1 | |style="padding: 5px;text-align:center;background-color:#111111;"|1 | ||
|style="padding: 5px;text-align:center;background-color:#111111;"| | |style="padding: 5px;text-align:center;background-color:#111111;"|{{WeightedProbability|totalWeight=16}} | ||
|- | |- | ||
|colspan="2" style="border-style: solid; border-width: 1px 0 1px 1px;border-right:solid 2px white;padding: 5px;background-color:#111111;"|{{ | |colspan="2" style="border-style: solid; border-width: 1px 0 1px 1px;border-right:solid 2px white;padding: 5px;background-color:#111111;"|{{ItemTable2|Radio}} | ||
|style="padding: 5px;text-align:center;background-color:#111111;"|1 | |style="padding: 5px;text-align:center;background-color:#111111;"|1 | ||
|style="padding: 5px;text-align:center;background-color:#111111;"| | |style="padding: 5px;text-align:center;background-color:#111111;"|{{WeightedProbability|totalWeight=16}} | ||
|- | |- | ||
|} | |} | ||
<small> | <small> | ||
| Line 62: | Line 71: | ||
==Gallery== | ==Gallery== | ||
<gallery mode="packed" widths=600px heights=338px> | |||
LCZPCStandardLocker.png| A Standard Locker found in PC15 | |||
HCZ939RoomStandardLockerClosed.png| A Standard Locker found in SCP-939's Containment Area | |||
HCZ939RoomStandardLockerOpened.png| An opened Standard Locker | |||
</gallery> | |||
==Trivia== | ==Trivia== | ||
* In earlier builds, Cabinets spawned instead of Lockers. These only spawned in Glass Room | * In earlier builds, Cabinets spawned instead of Standard Lockers. These only spawned in the Glass Room and Two-Story Office. Cabinets could be searched by holding E on them, after a bar filled up, an item was added to the player's inventory. Cabinets could only be looted once per round and only had one item. | ||
** The | ** The Cabinets in Entrance Zone had a very low chance to give a Facility Manager Keycard, allowing [[Mobile Task Force]] to recontain [[SCP-106]] or activate the [[Alpha Warhead]] early on in the game. | ||
***In even earlier builds, this allowed MTF to kill SCP-079 by opening his room and shooting him. | *** In even earlier builds, this allowed MTF to kill [[SCP-079]] by opening his room and shooting him. | ||
{{Locations Navbox}} | {{Locations Navbox}} | ||
Latest revision as of 04:45, 29 April 2023
| Standard Locker | |
|---|---|

| |
| Info | |
| Spawn | Light Containment Zone Heavy Containment Zone Entrance Zone |
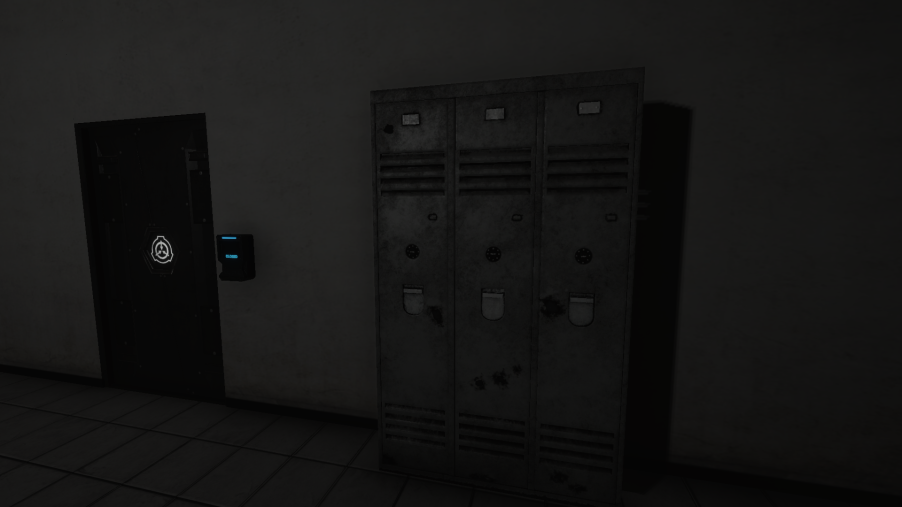
The Standard Locker is a type of Structure found in SCP: Secret Laboratory.
In Game
Standard Lockers are lockers that contain random loot and will randomly spawn in certain rooms around Site-02. Standard Lockers can be opened and closed by players by pressing the E key. The items inside of a Standard Locker are random each round.
There are six spawn points inside the Standard Locker where items can spawn. A minimum of two will always have loot, with a maximum of five being filled.
At least three Standard Lockers can spawn in a game, with a 50% for a fourth one to spawn.
Possible Spawn Locations
- One can spawn in the side room of the Garden Chamber.
- One can spawn to the left of the door in PC15, against the wall.
- One can spawn on the right wall of the Glass Room, across from the glass and door.
- One can spawn to the right of the door, outside of Test Chamber 1.
- One can spawn right next to the door to 173's Containment Chamber.
- One can spawn in the main lab of SCP-939's Containment Area, next to the door for Cryo Storage.
- Up to two can spawn in the Two-Story Office, opposite to the base of the stairs or by the top of the stairs.
- One can spawn within the cubical in the Large Office.
Possible Loot:
| Item | Max Chambers | Chance | |
|---|---|---|---|
 Scientist Keycard Scientist Keycard
|
2 | 18.75% | |
 Zone Manager Keycard Zone Manager Keycard
|
2 | 18.75% | |
 First Aid Kit First Aid Kit
|
1 | 12.5% | |
 Flashlight Flashlight
|
2 | 12.5% | |
 Janitor Keycard Janitor Keycard
|
1 | 12.5% | |
|
2 | 12.5% | |
|
1 | 6.25% | |
 Radio Radio
|
1 | 6.25% | |


Max Chambers shows how many times the loot can spawn in a locker. There are six Chambers, so an item of "Max Chambers 2" can spawn up to two times throughout the locker. It does not mean how much of a item spawns in one chamber.
Gallery
-
A Standard Locker found in PC15
-

A Standard Locker found in SCP-939's Containment Area
-
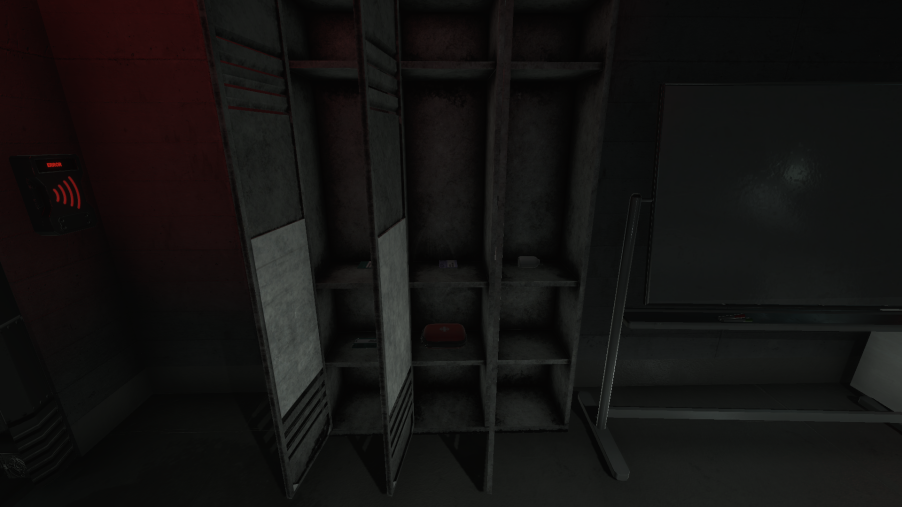
An opened Standard Locker


Trivia
- In earlier builds, Cabinets spawned instead of Standard Lockers. These only spawned in the Glass Room and Two-Story Office. Cabinets could be searched by holding E on them, after a bar filled up, an item was added to the player's inventory. Cabinets could only be looted once per round and only had one item.
- The Cabinets in Entrance Zone had a very low chance to give a Facility Manager Keycard, allowing Mobile Task Force to recontain SCP-106 or activate the Alpha Warhead early on in the game.
- In even earlier builds, this allowed MTF to kill SCP-079 by opening his room and shooting him.
- The Cabinets in Entrance Zone had a very low chance to give a Facility Manager Keycard, allowing Mobile Task Force to recontain SCP-106 or activate the Alpha Warhead early on in the game.
| ||||||||||||||||||||||